Getting Started with Kubernetes: Deploying a k8s Cluster using Minikube
February 15, 2023
Have you heard about Kubernetes and how it can help with container orchestration? It's an amazing platform, but setting up a Kubernetes cluster can be a daunting task, especially if you're new to it. Luckily, there are tools available that make it much easier to deploy a local Kubernetes cluster, and Minikube is one of the most popular. In this article, I'll guide you through the steps to deploy a local Kubernetes cluster using Minikube.
I'll cover how to install Minikube, start the cluster, verify that it's running, deploy a sample application(Nginx), and expose it using Kubernetes service. By following this guide, you'll be able to set up a local Kubernetes cluster quickly and start experimenting with Kubernetes without the need for a cloud environment or complex setup. So let's dive in and get started!
Prerequisites:
Before we start, you need to have the following prerequisites:
- A virtualization platform installed on your machine (e.g., VirtualBox or Hyper-V).
- A Linux, macOS, or Windows machine.
- A package manager installed on your machine (e.g., Homebrew for macOS or Chocolatey for Windows).
Minikube: https://minikube.sigs.k8s.io/docs/
Overview
- Install Minikube
- Start the Minikube cluster
- Verify the cluster is running
- Deploy a sample application
- Expose the sample application with a service
- Access the sample application
Steps:
Install Minikube
The first step in deploying a local Kubernetes cluster using Minikube is to install Minikube on your machine. The easiest way to install Minikube is using a package manager.
For macOS, you can use Homebrew to install Minikube by running the following command:
brew install minikube
For Windows, you can use Chocolatey to install Minikube by running the following command:
choco install minikube
For Linux x86_64, you can follow the installation instructions on the Minikube website.
curl -LO https://storage.googleapis.com/minikube/releases/latest/minikube-linux-amd64
sudo install minikube-linux-amd64 /usr/local/bin/minikube
For more installation methods: https://minikube.sigs.k8s.io/docs/start/
Start the Minikube cluster
Once you have installed Minikube, you can start the local Kubernetes cluster by running the following command:
minikube start
This command will start a single-node Kubernetes cluster on your machine using the virtualization platform installed on your machine.
You can customize the cluster configuration. For example to start a cluster with 6 nodes
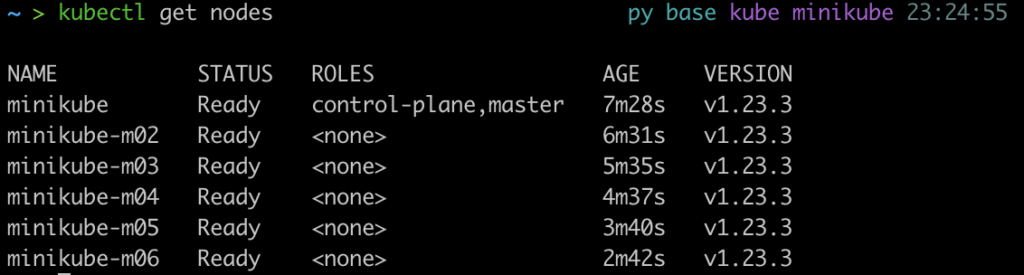
minikube start --nodes 6
Verify the cluster is running
After the cluster is started, you can verify that the cluster is running by running the following command:
kubectl get nodes
This command will display the nodes in the cluster.
Deploy a sample application
Once the cluster is running, you can deploy a sample application to test the cluster.
Here is an example deployment configuration file for a sample application:
apiVersion: apps/v1
kind: Deployment
metadata:
  name: nginx
spec:
  replicas: 3
  selector:
    matchLabels:
      app: nginx
  template:
    metadata:
      labels:
        app: nginx
    spec:
      containers:
      - name: nginx
        image: nginx:1.14-alpine
        ports:
        - containerPort: 80
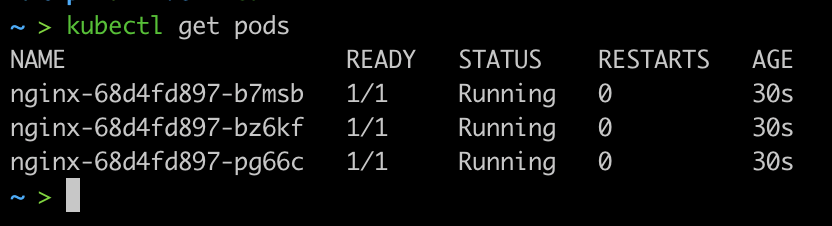
This deployment configuration file specifies that the deployment should have 3 replicas and should use the Docker image "nginx:1.14-alpine". It also specifies that the container should listen on port 80.
To deploy the sample application, run the following command:
kubectl apply -f deployment.yaml
This command will create the deployment on your Minikube cluster.
To check the pod status run the below command.
kubectl get pods
Expose the sample application with a service
To access the sample application from outside the Minikube cluster, you need to create a Kubernetes service to expose it.
Here is an example service configuration file for the sample application:
apiVersion: v1
kind: Service
metadata:
  name: nginx-service
spec:
  ports:
  - port: 80
    protocol: TCP
    targetPort: 80
  selector:
    app: nginx
  type: LoadBalancer
This service configuration file specifies that the service should listen on port 80 and target port 80.
To create the service, run the following command:
kubectl apply -f services.yaml
You can also create a service using kubectl expose command. For example by running the below command.
kubectl expose deployment nginx --type=LoadBalancer --port=80 --name=nginx-service
This command will create the service on your Minikube cluster.
To check services in cluster, run the below command.
kubectl get services

Access the sample application
you can access the sample application we need to create minikube tunnel by running the following command:
minikube tunnel

You need to keep this terminal open. Also if you update or create new services just stop the tunnel using CTRL + C and start the tunnel again.
Now, open your browser and type localhost to access the application.

Congratulations, you did it! You now have a local Kubernetes cluster running on your machine using Minikube.
Now that you have a local Kubernetes cluster, you can start experimenting with Kubernetes and learning more about container orchestration. There are many resources available to help you learn more starting with the Kubernetes documentation. With your new knowledge, you can use Kubernetes to manage containers in a more efficient, scalable, and flexible way.
We hope you found this guide helpful and that you enjoy exploring Kubernetes!