How to use IAM Auth with AWS MSK: A Step-by-Step Guide 2023
January 14, 2023
Amazon MSK is a fully managed, highly available, and secure service that makes it easy for developers and DevOps managers to run applications on Apache Kafka in the AWS Cloud without needing Apache Kafka infrastructure management expertise. Amazon MSK operates highly available Apache Kafka clusters, provides security features out of the box, is fully compatible with open-source versions of Apache Kafka allowing existing applications to migrate without code changes, and has built-in AWS integrations that accelerate application development. To learn more, read the Amazon MSK.
In this article, we'll learn how we can use IAM authentication with AWS MSK to prevent unauthorized access to MSK cluster.
Overview
- Create a MSK Cluster with IAM Auth
- Create IAM Policy
- Create IAM User
- Install AWS CLI
- Download Kafka Client and
aws-msk-iam-authJAR - Connect to MSK
- Create Kafka Topic
- List Kafka Topic
- Verify IAM Authentication
- Publish Kafka Msg
- Consume Kafka Msg
Steps:
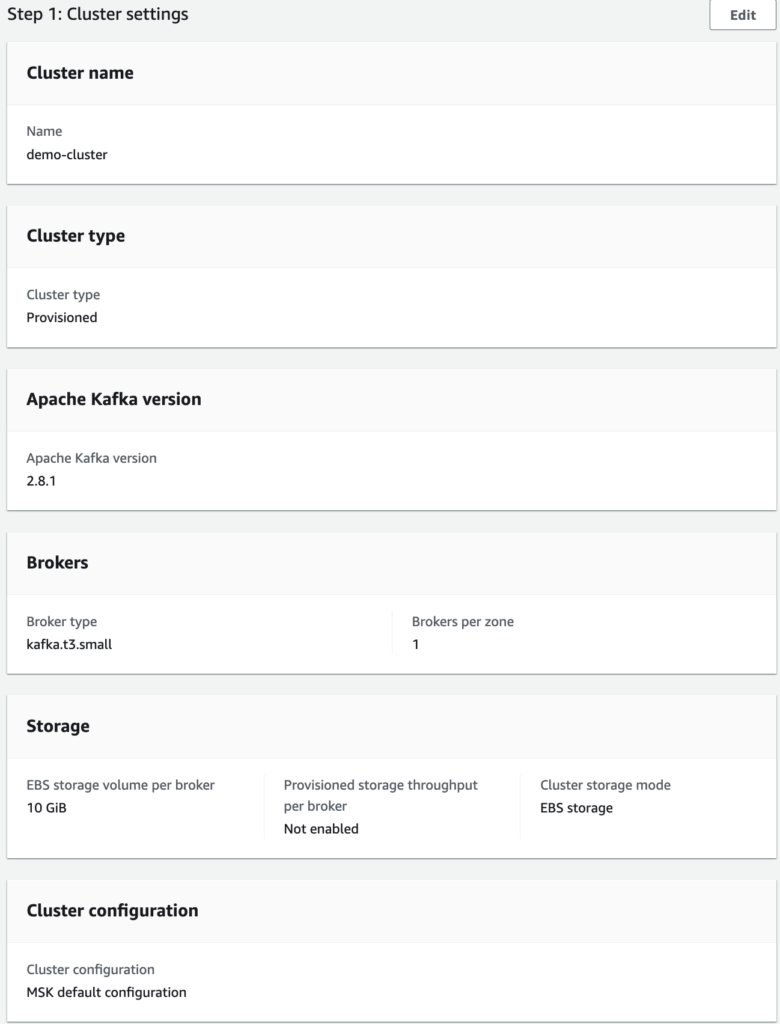
Step 1 : Create a MSK Cluster with IAM Auth
- Login to AWS Console and go to MSK service and Click on Create cluster.
- In Creation method Select
Customcreate. - In Cluster name enter cluster name
- In Cluster type select Provisioned.
- In Apache Kafka version select version, I'm using 2.8.1.
- In Brokers select broker type, for testing purposes i'm selecting
kafka.t3.smalland number of brokers to 2 and brokers per zone 1. - In Storage enter storage required, for testing i'm using only 10GiB.
- In Configuration i'm using default configuration and click Next.
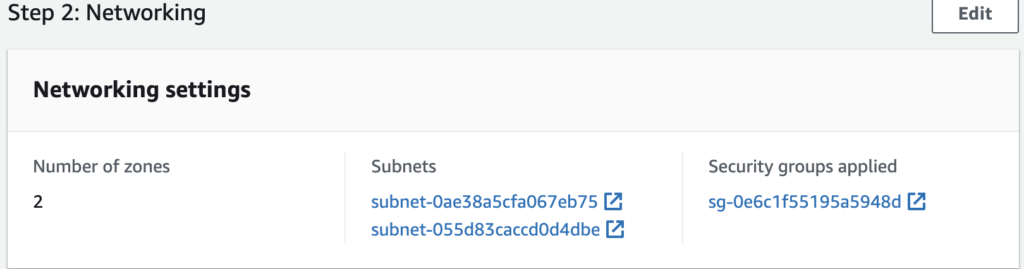
- In Networking select your VPC, subnet's and security group and click Next.
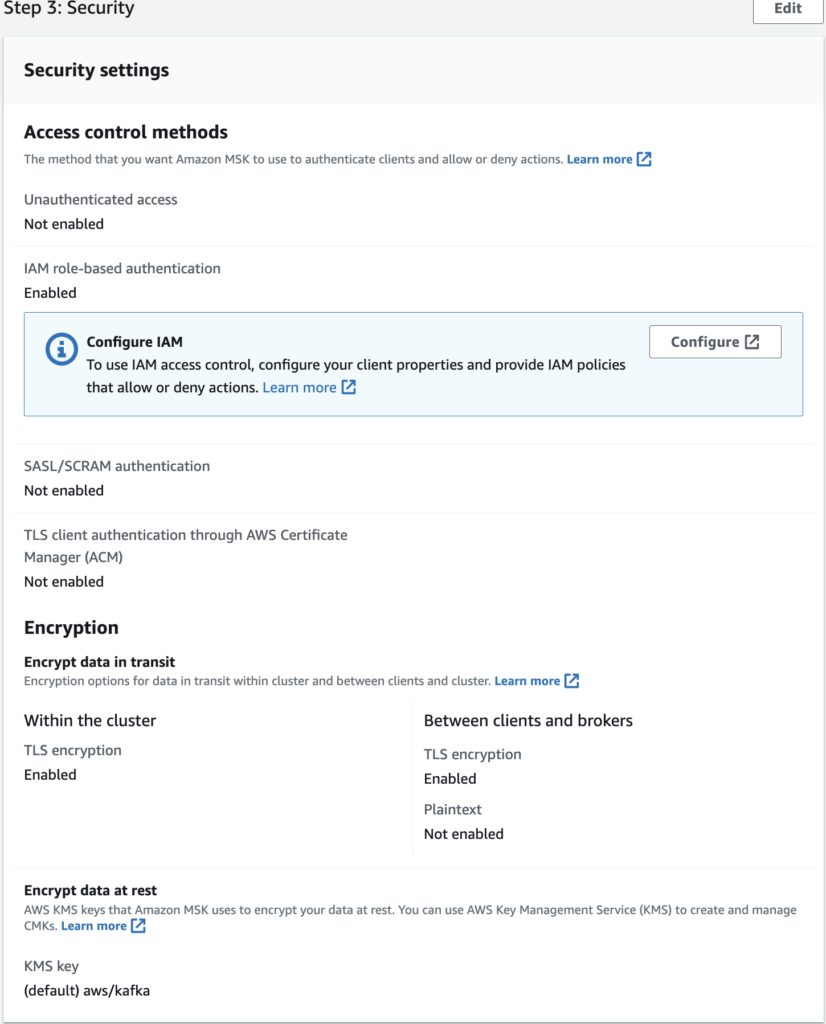
- In Security select IAM role-based authentication and click Next.
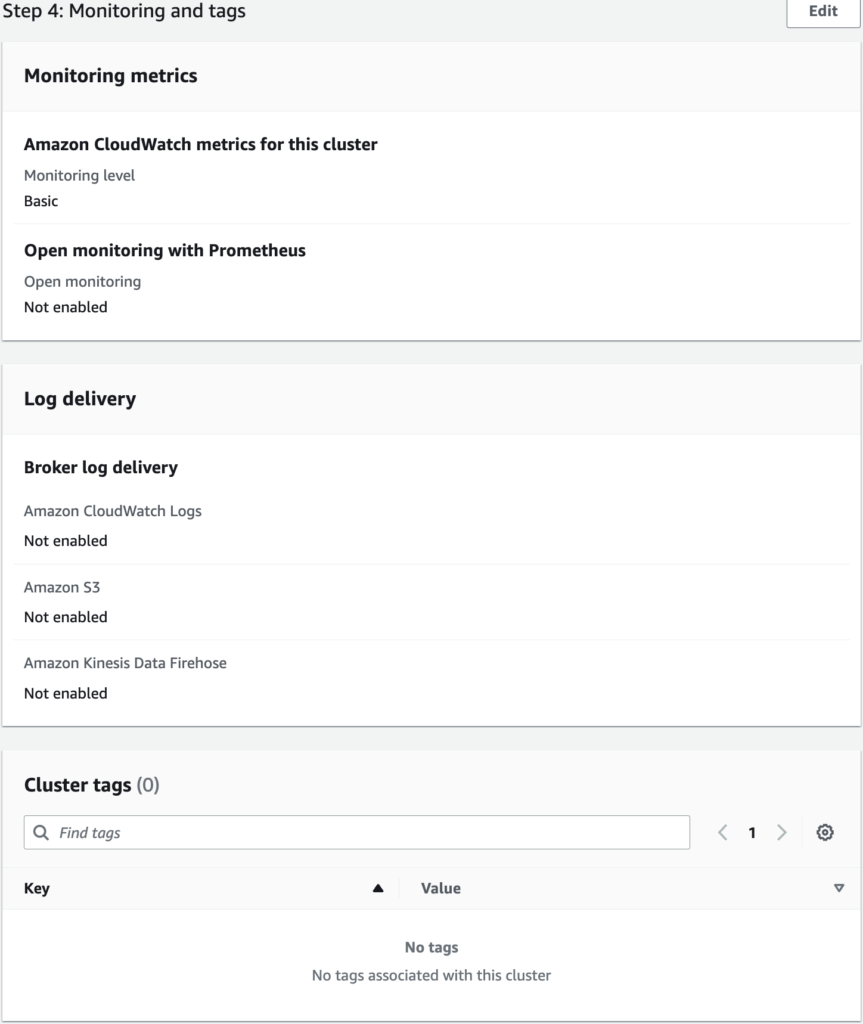
- In Monitoring i'm using Basic, you can explore other options for monitoring and logging at additional cost and click Next.
- Review Everything and Create cluster.
Note: A typical provisioned cluster takes up to 15 minutes to create.
Step 2 : Create IAM Policy
- Go to IAM service and Click on Policies and click Create policy.
- In Create policy select JSON and copy paste below below sample policy, add tags, review and create policy.
{
    "Version": "2012-10-17",
    "Statement": [
        {
            "Effect": "Allow",
            "Action": [
                "kafka-cluster:*Topic*",
                "kafka-cluster:AlterGroup",
                "kafka-cluster:ReadData",
                "kafka-cluster:DescribeCluster",
                "kafka-cluster:AlterCluster",
                "kafka-cluster:DescribeGroup",
                "kafka-cluster:Connect",
                "kafka-cluster:WriteData"
            ],
            "Resource": "*"
        }
    ]
}
You can use the asterisk (*) wildcard any number of times in an action after the colon. The following are examples.
kafka-cluster:*Topicstands forkafka-cluster:CreateTopic,kafka-cluster:DescribeTopic,kafka-cluster:AlterTopic, andkafka-cluster:DeleteTopic. It doesn't includekafka-cluster:DescribeTopicDynamicConfigurationorkafka-cluster:AlterTopicDynamicConfiguration.kafka-cluster:*stands for all permissions.
Note: use the above policy for reference and testing purposes only.
To learn how to create a policy with action elements that correspond to common Apache Kafka use cases, like producing and consuming data, see Common use cases.
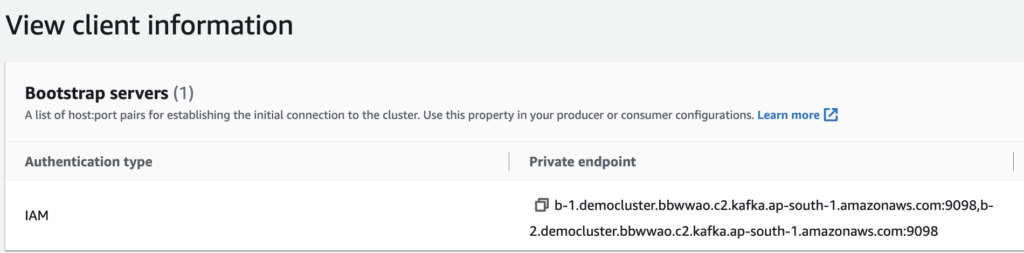
To get the broker endpoints click on your cluster name --> click on View client information.
Step 3 : Create IAM User
- In IAM service click on Users and click Add Users.
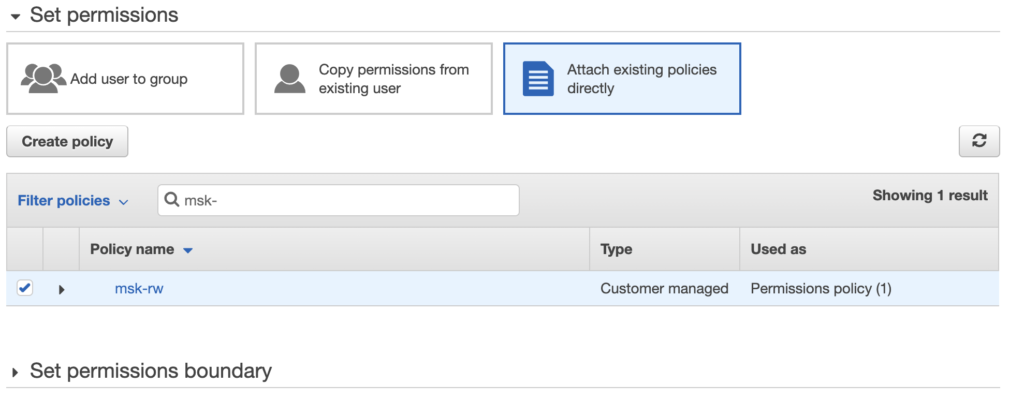
- Enter the username and select Access key - Programmatic access click add permissions and select Attach existing policies directly search for the policy you created and select the policy, click next , add tags, review and click Create user.
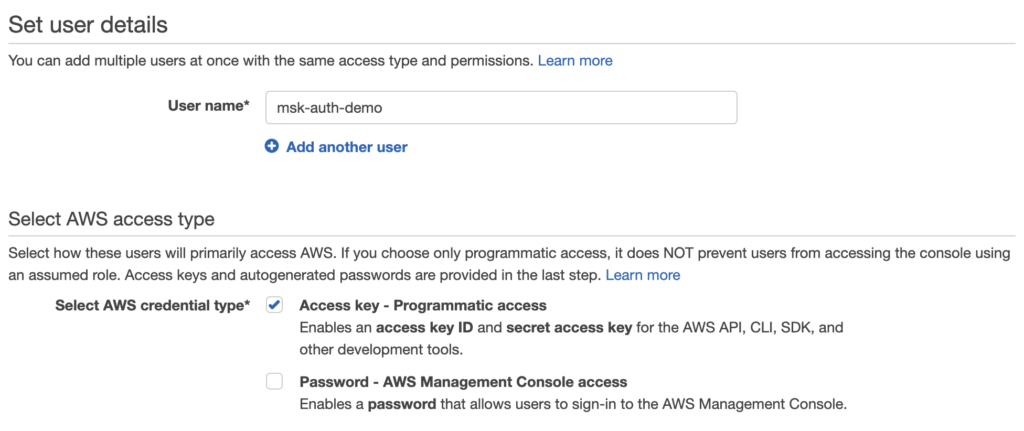
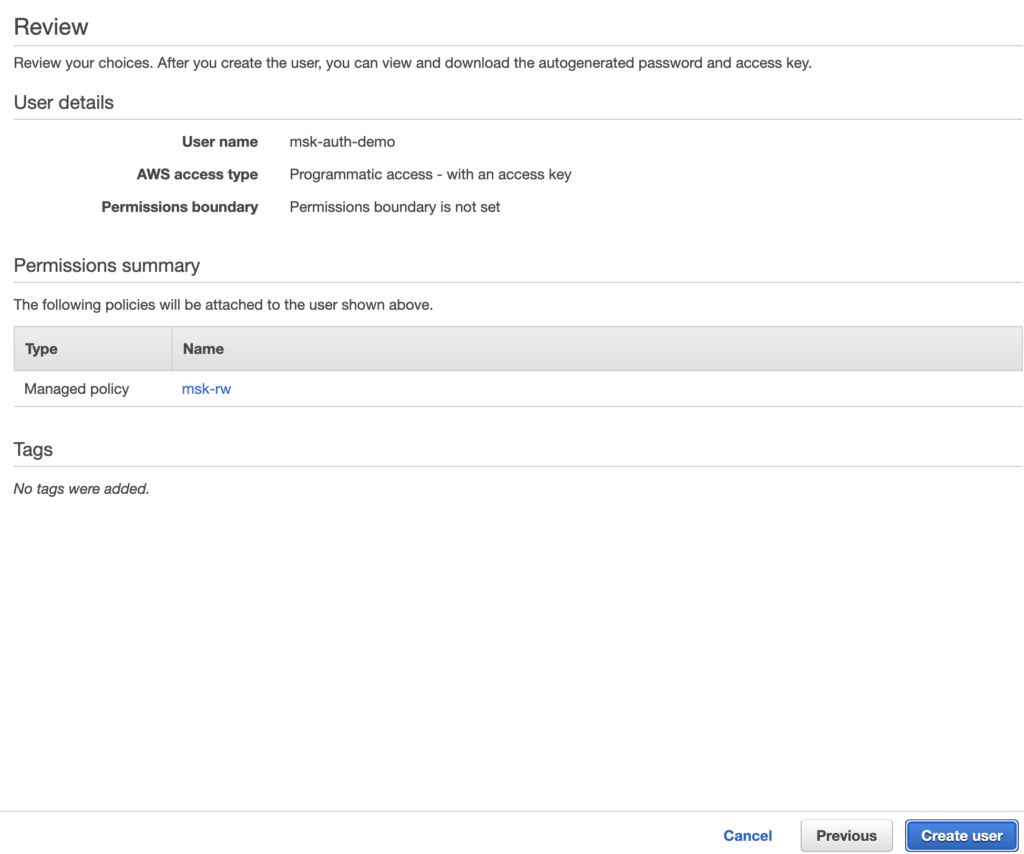
Note: Don't forget to download and save credentials, you won't be able to see it again.
Step 4 : Install AWS CLI
To install AWS CLI in ubuntu use the below commands:
sudo apt-get update
sudo apt-get install unzip -y
curl "https://awscli.amazonaws.com/awscli-exe-linux-x86_64.zip" -o "awscliv2.zip"
unzip awscliv2.zip
sudo ./aws/install
AWS CLI is installed, Now we need to configure credentials. Run the below command to configure the credentials we get from Step 3.
aws configure

set the region in which you created the MSK cluster.
Step 5 : Download kafka Client and aws-msk-iam-auth JAR
We need to install JDK first.
sudo apt install openjdk-11-jdk -y
To download Kafka client for version 2.8.1 use the below link. For other versions visit this link.
Version 2.8.1 : Link
wget https://archive.apache.org/dist/kafka/2.8.1/kafka_2.12-2.8.1.tgz
Other Version: Link
Once downloaded untar it.
tar -xvf kafka_2.12-2.8.1.tgz
Change the filename with your downloaded file.
Next, we need the aws-msk-iam-auth JAR file.
aws-msk-iam-auth Git: Link
wget https://github.com/aws/aws-msk-iam-auth/releases/download/v1.1.5/aws-msk-iam-auth-1.1.5-all.jar
Now, copy this JAR to the libs folder of Kafka client.
cp aws-msk-iam-auth-1.1.5-all.jar kafka_2.12-2.8.1/libs/
Step 6 : Connect to MSK
Go to Kafka client extracted folder.
cd kafka_2.12-2.8.1
Next, we need to create client.properties file.
vi client.properties
add the below content in the file and save it.
security.protocol=SASL_SSL
sasl.mechanism=AWS_MSK_IAM
sasl.jaas.config=software.amazon.msk.auth.iam.IAMLoginModule required;
sasl.client.callback.handler.class=software.amazon.msk.auth.iam.IAMClientCallbackHandler
Everything is ready now let's connect to MSK.
6.1. Create kafka Topic
To create a topic run the below command.
./bin/kafka-topics.sh --create --bootstrap-server b-1.democluster.bbwwao.c2.kafka.ap-south-1.amazonaws.com:9098,b-2.democluster.bbwwao.c2.kafka.ap-south-1.amazonaws.com:9098 --command-config client.properties --replication-factor 1 --partitions 1 --topic demo-topic
Output:

6.2. List Kafka Topics
To list topics run the below command.
./bin/kafka-topics.sh --list --bootstrap-server b-1.democluster.bbwwao.c2.kafka.ap-south-1.amazonaws.com:9098,b-2.democluster.bbwwao.c2.kafka.ap-south-1.amazonaws.com:9098 --command-config client.properties
Output:

From the output, you can see the list topics.
6.3. Verify IAM Authentication
Let's try to run the same command but without client.properties file.
./bin/kafka-topics.sh --list --bootstrap-server b-1.democluster.bbwwao.c2.kafka.ap-south-1.amazonaws.com:9098,b-2.democluster.bbwwao.c2.kafka.ap-south-1.amazonaws.com:9098
Output:
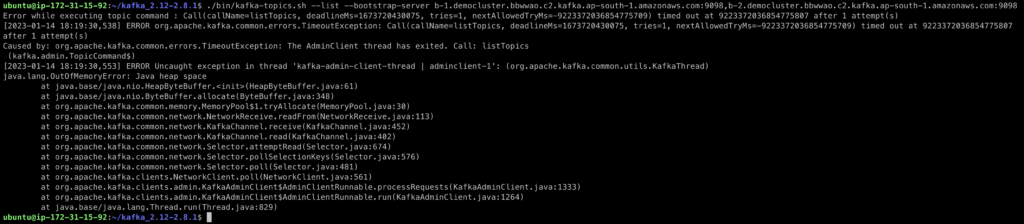
From the output, you can see it gives an error. We can say our IAM authentication is working as expected.
6.4. Publish Kafka Msg
To publish msg run the below command.
./bin/kafka-console-producer.sh --broker-list b-1.democluster.bbwwao.c2.kafka.ap-south-1.amazonaws.com:9098,b-2.democluster.bbwwao.c2.kafka.ap-south-1.amazonaws.com:9098 --topic demo-topic --producer.config client.properties
you'll get the prompt to enter your messages. let's type some sample messages.
Output:

6.5. Consume Kafka Msg
To consume Kafka msg, run the below command
./bin/kafka-console-consumer.sh --bootstrap-server b-1.democluster.bbwwao.c2.kafka.ap-south-1.amazonaws.com:9098,b-2.democluster.bbwwao.c2.kafka.ap-south-1.amazonaws.com:9098 --topic "demo-topic" --consumer.config client.properties --from-beginning
Output:

See Also: How to create Kafka Client in Python?